Truffleチュートリアル
前置き
Ethereumのwebフレームワークとして代表的なTruffle(トリュフ)のチュートリアルをやっていく。基本的に原文を読めばいいのだが、途中つまづいたりしたところを載せながら、不必要な部分を削除しながら進める。英語と翻訳を載せている部分は、google先生と自分の意訳が9:1ぐらいの割合になっています。なので正確な情報を知りたい方はソース元を見てください。
尚株式会社Chaintopeという所にはMr NakajoというリアルガチTruffleコントリビューターがいるので、素早く解決したい&コネがある方は彼に聞いた方が早いと思われる。
- Truffleチュートリアル ~Ethereum Pet Shop~
- Truffle Ethereum Tutorial 日本語訳~Ehereum Pet Shop~
↑注:一年近く前の記事の為、紹介されているコードが古い。これ通りに進めると多分失敗するので 補足程度で見るといいと思う。 - Truffle HP
- Truffle Github
環境
Truffleの概要
Ethereumのスマートコントラクトを書くためのフレームワーク (Ruby on Rail的な感じ)。おそらく現状のベストプラクティス。というかこれしかないっぽい。 他、ライブラリなどの開発環境に関しては少し古いけど以下の記事がわかりやすいのでそれを参考にすると良いと思う。 - EthereumとContracts開発を取り巻くエコシステムの概要
背景
Pete Scandlon of Pete's Pet Shop is interested in using Ethereum as an efficient way to handle their pet adoptions. The store has space for 16 pets at a given time, and they already have a database of pets. As an initial proof of concept, Pete wants to see a dapp which associates an Ethereum address with a pet to be adopted.
The website structure and styling will be supplied. Our job is to write the smart contract and front-end logic for its usage.
Pete's ペットショップを経営するPete Scandlonは、効率的にペットの飼い主決定を処理する方法として、Ethereumを使ってみたいと考えています。この店にはペット用のスペースが16匹分有り、またすでにペットのデータベースは持っています。オーナーのPeteはまず第一歩として、コンセプトを理解するために、ペットとEthereumのアドレスを紐付けるようなdappを見てみたいと考えています。 これを動かすためのwebサイトの構造とスタイリングは提供されます。私達の仕事は、スマートコントラクトと、それを使用するためのフロントエンドのロジックを作成することです。
環境設定
初める前に以下が必要。ない場合は以下のリンク先に従って設定しよう。
Truffleインストール
npm install -g truffle
これだけ、あら簡単。すでにNode.jsが入っている人は一旦$ npm install -g npmとやっておくと良いかも。ちなみに自分は前にTruffleを入れていたので、$ npm install -g npmの後に $ npm update -g truffleでバージョンアップさせた。
終わったら$ truffle version, $ which truffleとか打ってバージョン,パスが出てきたらOK。自分の環境下では以下のようになった。
バージョン:Truffle v5.0.26 - a development framework for Ethereum

パス:/Users/toshiki/.nvm/versions/node/v10.13.0/bin/truffle
プロジェクト作成
Truffleは現在のディレクトリで初期化するので、最初に選択した開発フォルダにディレクトリを作成してから、その中に移動する。
$ mkdir -p pet-shop-tutorial; cd pet-shop-tutorial
$ truffle unbox pet-shop
ちなみに初期化としては
$ truffle initもある。こちらはコントラクトのサンプルを含まないらしいので、それらが必要ない方はinitを使用すれば良いかと。
ディレクトリ構造
The default Truffle directory structure contains the following:
- contracts/: Contains the Solidity source files for our smart contracts. There is an important contract in here called Migrations.sol, which we'll talk about later.
- migrations/: Truffle uses a migration system to handle smart contract deployments. A migration is an additional special smart contract that keeps track of changes.
- test/: Contains both JavaScript and Solidity tests for our smart contracts
- truffle-config.js: Truffle configuration file
The pet-shop Truffle Box has extra files and folders in it, but we won't worry about those just yet.
デフォルトのTruffleディレクトリ構造には、次のものが含まれています。 - contracts/:スマートコントラクト用のSolidityソースファイルが含まれています。ここには重要な契約がありMigrations.solます。これについては後で説明します。 - migrations/:Truffleは、スマート契約の導入を処理するために移行システムを使用しています。移行は、変更を追跡する追加の特別なスマート契約です。 - test/:スマートコントラクトのためのJavaScriptテストとSolidityテストの両方が含まれています - truffle-config.js:トリュフ設定ファイル
pet-shopトリュフボックスがそれに余分なファイルやフォルダを持っているが、我々はまだ、これらの心配はありません
スマートコントラクトを書く
- contracts/ディレクトリにAdoption.solを作成
- ファイルには以下を書く
pragma solidity ^0.5.0;

contract Adoption {

}
解説
必要なSolidityの最小バージョンは、コントラクトのトップに記載されている0.5.0。pragmaコマンドは「 コンパイラのみが気にする追加情報 」を意味し、キャレット記号(^)は「 それ以上のバージョン 」を意味します。 JavaScriptやPHPと同様に、ステートメントはセミコロンで終了します。
変数設定
Solidity is a statically-typed language, meaning data types like strings, integers, and arrays must be defined. Solidity has a unique type called an address. Addresses are Ethereum addresses, stored as 20 byte values. Every account and smart contract on the Ethereum blockchain has an address and can send and receive Ether to and from this address.
Solidityは静的プログラミング言語です。なので、文字列、整数、配列などのデータ型を定義しなければなりません。またSolidityにはアドレスと呼ばれるunique typeがあります 。アドレスは、20バイトの値として格納されたEthereumアドレスです。Ethereumブロックチェーンのすべてのアカウントとスマートコントラクトにはアドレスがあり、このアドレスとの間でEtherを送受信できます。
- contract Adoption { 後の次の行に次の変数を追加。
address[16] public adopters;
Things to notice:
- We've defined a single variable:
adopters. This is an array of Ethereum addresses. Arrays contain one type and can have a fixed or variable length. In this case the type isaddressand the length is16. - You'll also notice
adoptersis public. Public variables have automatic getter methods, but in the case of arrays a key is required and will only return a single value. Later, we'll write a function to return the whole array for use in our UI.
解説:
- 変数
adoptersを定義しました。これはEthereumアドレスの配列です。配列には1つの型が含まれ、固定長または可変長を持つことができます。この場合、タイプはaddressで長さは16です。- また、
adoptersがpublicなことに気づくでしょう。public変数には自動ゲッターメソッドがありますが、配列の場合はキーが必要であり、単一の値しか返しません。後で、UI全体で使用するために配列全体を返す関数を作成します。
1つ目のFunction : ペットの引取り
お客様がペットの引取を要求できるようにしよう。 1. 上記で設定した変数宣言のあとに、次の関数を追加。
// Adopting a pet
function adopt(uint petId) public returns (uint) {
  require(petId >= 0 && petId <= 15);

  adopters[petId] = msg.sender;

  return petId;
}
Things to notice:
In Solidity the types of both the function parameters and output must be specified. In this case we'll be taking in a
petId(integer) and returning an integer.We are checking to make sure
petIdis in range of ouradoptersarray. Arrays in Solidity are indexed from 0, so the ID value will need to be between 0 and 15. We use therequire()statement to ensure the ID is within range.If the ID is in range, we then add the address that made the call to our
adoptersarray. The address of the person or smart contract who called this function is denoted bymsg.sender.Finally, we return the
petIdprovided as a confirmation.
解説:
- Solidityでは、関数のパラメータと出力の両方の型を指定する必要があります。ここでは、パラメータとして
petId(integer)を入力し、integerを出力する設定です。petIdがadopters配列の範囲内にあることを確認しています。Solinityの配列は0からインデックスされるため、ID値は0から15の間である必要があります。IDが範囲内にあることを確認するには、require()ステートメントを使用します。- IDが範囲内にある場合は、呼び出しを行ったアドレスを
adopters配列に追加します。この機能を呼び出した人、または呼び出したスマートコントラクトのアドレスは、msg.senderによって示されます。- 最後に、提供された
petIdを確認のために返します。
2つ目のFunction : Adoptersの取得
As mentioned above, array getters return only a single value from a given key. Our UI needs to update all pet adoption statuses, but making 16 API calls is not ideal. So our next step is to write a function to return the entire array.
前述のように、配列ゲッターは与えられたキーから単一の値だけを返します。私たちのUIはすべてのペットの採用状況を更新する必要がありますが、16のAPI呼び出しを行うことは理想的ではありません。だから次のステップは、配列全体を返す関数を書くことです。
(1) 上に追加したgetAdopters()関数の後に、次のadopt()関数をスマートコントラクトに追加します。
// Retrieving the adopters
function getAdopters() public view returns (address[16]) {
  return adopters;
}
(2) Since adopters is already declared, we can simply return it. Be sure to specify the return type (in this case, the type for adopters) as address[16] memory. memory gives the data location for the variable.
(3) The view keyword in the function declaration means that the function will not modify the state of the contract. Further information about the exact limits imposed by view is available here.
(2)
adoptersは既に宣言されているので、単にそれを返すことができます。必ず戻り型(この場合はforの型adopters)を指定してくださいaddress[16] memory。memory変数のデータ位置を指定します。
(3)view関数宣言内のキーワードは、その関数が契約の状態を変更しないことを意味します。ビューによって課される正確な制限についてのさらなる情報はここで利用可能です。
スマートコントラクトのコンパイルと移行
スマートコントラクトが作成出来たので、次のステップは、それをコンパイルして移行することです。 Truffleには開発者コンソールが組み込まれています。これをTruffle Developと呼びます。これはデプロイしたスマートコントラクトをテストするために使用できる、開発ブロックチェーンを生成します。 また、コンソールからTruffleコマンドを直接実行することもできます。このチュートリアルでは、Truffle Developを使用して、スマートコントラクトのほとんどの処理を実行します。
あら簡単!これで今回作りたいスマートコントラクトは完成 以下に今回の全体コード載せておきます。(2019/7/9時点)
pragma solidity ^0.5.0;
contract Adoption {
  address[16] public adopters;

  function adopt(uint petId) public returns (uint) {
  require(petId >= 0 && petId <= 15);

  adopters[petId] = msg.sender;

  return petId;
  }

  function getAdopters() public view returns (address[16] memory) {
    return adopters;
  }
}
コンパイル
Solidity is a compiled language, meaning we need to compile our Solidity to bytecode for the Ethereum Virtual Machine (EVM) to execute. Think of it as translating our human-readable Solidity into something the EVM understands.
Solidityはコンパイルされた言語です。つまり、Ethereum仮想マシン(EVM)を実行するためにSolinityをバイトコードにコンパイルする必要があります。人間が読めるSolidityをEVMが理解できるものに変換するものと考えてください。
- 端末で、dappを含むディレクトリのルートにあることを確認して、次のように入力します。
自分の場合は以下の通り(おそらく手順通りやっていればこうなっているはず)

$ truffle compile

Migration
Now that we've successfully compiled our contracts, it's time to migrate them to the blockchain!
A migration is a deployment script meant to alter the state of your application's contracts, moving it from one state to the next. For the first migration, you might just be deploying new code, but over time, other migrations might move data around or replace a contract with a new one.
スマートコントラクトが完成したので、ブロックチェーンに移行しましょう! Migrationとは、アプリケーションの契約の状態を変更し、ある状態から次の状態に移行するためのデプロイスクリプトです。 最初の移行では、新しいコードを導入しているだけかもしれませんが、他の場合にはデータを移動したり、契約を新しいものに置き換えたりする可能性があります。
注意:移行の詳細については、Truffleのドキュメントを参照してください
1つのJavaScriptファイルがmigrations/ディレクトリにあることが確認できるでしょう(1_initial_migration.js)。 これは、Migrations.solコントラクトを展開し、その後のスマートコントラクトの移行を監視し、二重契約が起きないようにハンドルします。 これで、独自の移行スクリプトを作成する準備が整いました。
(1)migrations/下に2_deploy_contracts.jsという名前の新しいファイルを作成します。
(2)2_deploy_contracts.jsファイルに次のコードを追加します。
var Adoption = artifacts.require("Adoption");

module.exports = function(deployer) {
  deployer.deploy(Adoption);
};
(3)コントラクトをブロックチェーンに移行する前に、ブロックチェーンを実行する必要があります。このチュートリアルでは、契約の展開、アプリケーションの開発、テストの実行に使用できるEthereum開発用の個人用ブロックチェーンであるGanacheを使用します。 Ganacheをまだダウンロードしていない場合は、 Ganacheをダウンロードしてアイコンをダブルクリックしてアプリケーションを起動してください。これにより、ポート7545でローカルで動作するブロックチェーンが生成されます。(水色部分がニーモニックになっているので、忘れないように!後で使うよ)

(4)ターミナルに戻って、コントラクトをブロックチェーンに移行します。
$ truffle migrate
すると、次のような出力が表示されます。

順番に移行が実行され、展開されたコントラクトのブロックチェーンアドレスが表示されます(アドレスは個人毎に異なります)。
- Ganacheでは、ブロックチェーンの状態が変わったことに注意してください。CURRENT BLOCKは0から4に。最初のアカウントはもともと100Etherを持っていましたが、移行のトランザクションコストのために今は低くなっています。後で取引費用について詳しく説明します。

最初のスマートコントラクトを書いて、それをローカルで実行しているブロックチェーンに配備しました。 私たちが望んでいることを確かめるために、スマートコントラクトとやり取りする準備が整いました。
Test
Truffle is very flexible when it comes to smart contract testing, in that tests can be written either in JavaScript or Solidity. In this tutorial, we'll be writing our tests in Solidity.
Create a new file named TestAdoption.sol in the test/ directory.
Add the following content to the TestAdoption.sol file:
スマートコントラクトのテストに関しては、Truffleは非常に柔軟性があります。テストはJavaScriptまたはSolidityで書くことができるからです。このチュートリアルでは、Solidityでテストを書きます。
(1)名前の新しいファイルをtest/ディレクトリ下にTestAdoption.solを作成します。 (2)TestAdoption.solに次の内容を追加します。
pragma solidity ^0.5.0;

import "truffle/Assert.sol";
import "truffle/DeployedAddresses.sol";
import "../contracts/Adoption.sol";

contract TestAdoption {
 // The address of the adoption contract to be tested
 Adoption adoption = Adoption(DeployedAddresses.Adoption());

 // The id of the pet that will be used for testing
 uint expectedPetId = 8;

 //The expected owner of adopted pet is this contract
 address expectedAdopter = address(this);

}
We start the contract off with 3 imports:
Assert.sol: Gives us various assertions to use in our tests. In testing, an assertion checks for things like equality, inequality or emptiness to return a pass/fail from our test. Here's a full list of the assertions included with Truffle.DeployedAddresses.sol: When running tests, Truffle will deploy a fresh instance of the contract being tested to the blockchain. This smart contract gets the address of the deployed contract.Adoption.sol: The smart contract we want to test.
Note: The first two imports are referring to global Truffle files, not a truffle directory. You should not see a truffle directory inside your test/ directory.
Then we define three contract-wide variables:
- First, one containing the smart contract to be tested, calling the DeployedAddresses smart contract to get its address.
- Second, the id of the pet that will be used to test the adoption functions.
- Third, since the TestAdoption contract will be sending the transaction, we set the expected adopter address to this, a contract-wide variable that gets the current contract's address.
我々は3つのimportでスマコンを始めます: -
Assert.sol:私たちのテストで使用するためのさまざまなアサーションを提供します。テストでは、アサーションはテストの合否を返すための平等、不平等、または空などをチェックします。これがTruffleに含まれるアサーションの全リストです。 -DeployedAddresses.soを実行すると、Truffleはテスト中の契約の新しいインスタンスをブロックチェーンにデプロイします。このスマートコントラクトは、デプロイされたコントラクトのアドレスを取得します。 -Adoption.sol:テストしたいスマートコントラクト
注意:最初の2つのインポートは、truffleディレクトリではなく、グローバルなTruffleファイルを参照しています。あなたはあなたのtruffleディレクトリの中にtest/ディレクトリを見るべきではありません。
次に、3つのスマコンの変数を定義します。
Testing the adopt() function
To test the adopt() function, recall that upon success it returns the given petId. We can ensure an ID was returned and that it's correct by comparing the return value of adopt() to the ID we passed in.
(1)Add the following function within the TestAdoption.sol smart contract, after the declaration of Adoption:
// Testing the adopt() function
function testUserCanAdoptPet() public {
  uint returnedId = adoption.adopt(expectedPetId);

  Assert.equal(returnedId, expectedPetId, "Adoption of the expected pet should match what is returned.");
}
Things to notice:
- We call the smart contract we declared earlier with the ID of expectedPetId.
- Finally, we pass the actual value, the expected value and a failure message (which gets printed to the console if the test does not pass) to Assert.equal().
解説
先に宣言したスマートコントラクトをのIDと呼びますexpectedPetId。
最後に、実際の値、期待値、および失敗メッセージ(テストに合格しなかった場合はコンソールに表示される)を渡しAssert.equal()ます。
Testing retrieval of a single pet's owner
Remembering from above that public variables have automatic getter methods, we can retrieve the address stored by our adoption test above. Stored data will persist for the duration of our tests, so our adoption of pet expectedPetId above can be retrieved by other tests.
上記から、パブリック変数には自動取得メソッドがあることを思い出してください。上記の採用テストで保存されたアドレスを取得できます。保存されたデータは私達のテストの間持続するので、
expectedPetId上のペットの私達の採用は他のテストで検索することができます。
(1)先ほど追加した関数の下に以下の関数を追加してください
// Testing retrieval of a single pet's owner
function testGetAdopterAddressByPetId() public {
  address adopter = adoption.adopters(expectedPetId);

  Assert.equal(adopter, expectedAdopter, "Owner of the expected pet should be this contract");
}
After getting the adopter address stored by the adoption contract, we assert equality as we did above.
採用契約によって採用された採用者の住所を取得した後、上記と同じように平等を主張します。
Testing retrieval of all pet owners
Since arrays can only return a single value given a single key, we create our own getter for the entire array.
配列は単一のキーで与えられた単一の値しか返すことができないので、配列全体に対して独自のゲッターを作成します。
(1)先ほど追加した関数の下に以下の関数を追加してください
// Testing retrieval of all pet owners
function testGetAdopterAddressByPetIdInArray() public {
  // Store adopters in memory rather than contract's storage
  address[16] memory adopters = adoption.getAdopters();

  Assert.equal(adopters[expectedPetId], expectedAdopter, "Owner of the expected pet should be this contract");
}
Note the memory attribute on adopters. The memory attribute tells Solidity to temporarily store the value in memory, rather than saving it to the contract's storage. Since adopters is an array, and we know from the first adoption test that we adopted pet expectedPetId, we compare the testing contracts address with location expectedPetId in the array.
adoptersのメモリ属性に注意してください。memory属性は、値を契約のストレージに保存するのではなく、一時的にメモリに保存するようにSolidityに指示します。以降のadopters配列であり、そして我々はペットを採用した最初の採用試験から知っているexpectedPetId、我々は、テスト契約が位置アドレス比較expectedPetId配列内。
完成コードは以下の通り(2019/7/9時点)
pragma solidity ^0.5.0;

import "truffle/Assert.sol";
import "truffle/DeployedAddresses.sol";
import "../contracts/Adoption.sol";

contract TestAdoption {
  Adoption adoption = Adoption(DeployedAddresses.Adoption());

  uint expectedPetId = 8;

  address expectedAdopter = address(this);

  function testUserCanAdoptPet() public {
    uint returnedId = adoption.adopt(8);

    Assert.equal(returnedId, expectedPetId, "Adoption of the expected pet should match what is recorded.");
  }

  function testGetAdopterAddressByPetId() public {
    address adopter = adoption.adopters(expectedPetId);

    Assert.equal(adopter, expectedAdopter, "Owner of the expected pet should be this contract");
  }

  function testGetAdopterAddressByPetIdArray() public {
    address[16] memory adopters = adoption.getAdopters();

    Assert.equal(adopters[expectedPetId], expectedAdopter, "Owner of the expected pet should be this contract");
  }
}
テスト実行
(1) ターミナルに戻って、テストを実行しましょう。コマンドは以下の通り
$ truffle test
(2) もし成功したら以下のようになります。(見辛くてごめんなさい!ここは本家を見た方がいいかも)

コントラクトを使用するためのインターフェイスの作成
Now that we've created the smart contract, deployed it to our local test blockchain and confirmed we can interact with it via the console, it's time to create a UI so that Pete has something to use for his pet shop!
Included with the pet-shop Truffle Box was code for the app's front-end. That code exists within the src/ directory.
The front-end doesn't use a build system (webpack, grunt, etc.) to be as easy as possible to get started. The structure of the app is already there; we'll be filling in the functions which are unique to Ethereum. This way, you can take this knowledge and apply it to your own front-end development.
スマートコントラクトを作成し、それをローカルのテストブロックチェーンにデプロイし、コンソールを介して対話できることを確認したので、Peteが自分のペットショップに使用できるようにUIを作成します。
pet-shopトリュフボックスには、アプリのフロントエンド用のコードが含まれています。そのコードはsrc/ディレクトリ内に存在します。 できるだけ簡単に始めるために、フロントエンドはビルドシステム(webpack、gruntなど)を使用しません。アプリの構造はすでにあります。私達はEthereumに特有の機能を埋めます。このようにして、あなたはこの知識を取り、あなた自身のフロントエンド開発にそれを適用することができます。
Instantiating web3
(1) /src/js/app.js を適当なエディターで開きます。
(2) ファイルを調べてください。Appアプリケーションを管理し、petデータをロードしてinit()から関数を呼び出すためのグローバルオブジェクトがありますinitWeb3()。JavaScriptのライブラリweb3イーサリアムのblockchainと対話します。ユーザーアカウントの取得、トランザクションの送信、スマートコントラクトとのやり取りなどができます。
(3) initWeb3の中のコメントを削除し、以下のコードを入力します。
// Modern dapp browsers...
if (window.ethereum) {
  App.web3Provider = window.ethereum;
  try {
    // Request account access
    await window.ethereum.enable();
  } catch (error) {
    // User denied account access...
    console.error("User denied account access")
  }
}
// Legacy dapp browsers...
else if (window.web3) {
  App.web3Provider = window.web3.currentProvider;
}
// If no injected web3 instance is detected, fall back to Ganache
else {
  App.web3Provider = new Web3.providers.HttpProvider('http://localhost:7545');
}
web3 = new Web3(App.web3Provider);
Things to notice:
First, we check if we are using modern dapp browsers or the more recent versions of MetaMask where an
ethereumprovider is injected into thewindowobject. If so, we use it to create our web3 object, but we also need to explicitly request access to the accounts withethereum.enable().If the
ethereumobject does not exist, we then check for an injected web3 instance. If it exists, this indicates that we are using an older dapp browser (like Mist or an older version of MetaMask). If so, we get its provider and use it to create our web3 object.If no injected web3 instance is present, we create our web3 object based on our local provider. (This fallback is fine for development environments, but insecure and not suitable for production.)
解説
- 私たちは、現代DAPPブラウザまたはより新しいバージョンの使用している場合はまず、我々はチェックMetaMask
ethereumプロバイダが中に注入されるwindowオブジェクトを。もしそうなら、私達は私達のweb3オブジェクトを作成するためにそれを使用しますが、我々はまた明示的にアカウントへのアクセスを要求する必要がありますethereum.enable()。ethereumオブジェクトが存在しない場合は、挿入されたweb3インスタンスを確認します。もしそれが存在すれば、これは私たちがより古いdappブラウザ(MistやMetaMaskのより古いバージョンのような)を使っていることを示しています。もしそうなら、そのプロバイダを取得し、それを使ってweb3オブジェクトを作成します。- 注入されたweb3インスタンスが存在しない場合は、ローカルプロバイダに基づいてweb3オブジェクトを作成します。(このフォールバックは開発環境には問題ありませんが、安全ではなく、本番環境には適していません。)
Instantiating the contract
Now that we can interact with Ethereum via web3, we need to instantiate our smart contract so web3 knows where to find it and how it works. Truffle has a library to help with this called truffle-contract. It keeps information about the contract in sync with migrations, so you don't need to change the contract's deployed address manually.
web3を介してEthereumとやり取りできるようになったので、web3がそれを見つける場所と動作方法を認識できるようにスマートコントラクトをインスタンス化する必要があります。Truffleにはこれを手助けするライブラリがあります
truffle-contract。契約に関する情報を移行と同期させるので、契約の展開先アドレスを手動で変更する必要はありません。
(1) 先ほどのコードの下にある、 initContractの中のコメントを削除し、以下のコードを入力します。
$.getJSON('Adoption.json', function(data) {
  // Get the necessary contract artifact file and instantiate it with truffle-contract
  var AdoptionArtifact = data;
  App.contracts.Adoption = TruffleContract(AdoptionArtifact);

  // Set the provider for our contract
  App.contracts.Adoption.setProvider(App.web3Provider);

  // Use our contract to retrieve and mark the adopted pets
  return App.markAdopted();
});
Things to notice:
We first retrieve the artifact file for our smart contract. Artifacts are information about our contract such as its deployed address and Application Binary Interface (ABI). The ABI is a JavaScript object defining how to interact with the contract including its variables, functions and their parameters.
Once we have the artifacts in our callback, we pass them to
TruffleContract(). This creates an instance of the contract we can interact with.With our contract instantiated, we set its web3 provider using the
App.web3Providervalue we stored earlier when setting up web3.We then call the app's
markAdopted()function in case any pets are already adopted from a previous visit. We've encapsulated this in a separate function since we'll need to update the UI any time we make a change to the smart contract's data.
解説:
最初に、スマートコントラクトの案件ファイルを取得します。成果物とは、デプロイされたアドレスやApplication Binary Interface(ABI)など、契約に関する情報です。ABIは、その変数、関数、およびそれらのパラメータを含む、コントラクトとの対話方法を定義するJavaScriptオブジェクトです。
コールバックにアーティファクトがあると、それをに渡します
TruffleContract()。これにより、私たちがやり取りできる契約のインスタンスが作成されます。インスタンス化された私達の契約で、私達はweb3をセットアップする
App.web3Providerときに先に保存した値を使ってそのweb3プロバイダーを設定します。
markAdopted()前回の訪問でペットが既に養子になっている場合に備えて、アプリの機能を呼び出します。スマートコントラクトのデータを変更するたびにUIを更新する必要があるため、これを別の関数にカプセル化しました。
Getting The Adopted Pets and Updating The UI
(1) markAdoptedの中のコメントを削除し、以下のコードを入力します。
var adoptionInstance;

App.contracts.Adoption.deployed().then(function(instance) {
  adoptionInstance = instance;

  return adoptionInstance.getAdopters.call();
}).then(function(adopters) {
  for (i = 0; i < adopters.length; i++) {
    if (adopters[i] !== '0x0000000000000000000000000000000000000000') {
      $('.panel-pet').eq(i).find('button').text('Success').attr('disabled', true);
    }
  }
}).catch(function(err) {
  console.log(err.message);
});
Things to notice:
We access the deployed
Adoptioncontract, then callgetAdopters()on that instance.We first declare the variable
adoptionInstanceoutside of the smart contract calls so we can access the instance after initially retrieving it.Using call() allows us to read data from the blockchain without having to send a full transaction, meaning we won't have to spend any ether.
After calling
getAdopters(), we then loop through all of them, checking to see if an address is stored for each pet. Since the array contains address types, Ethereum initializes the array with 16 empty addresses. This is why we check for an empty address string rather than null or other falsey value.Once a
petIdwith a corresponding address is found, we disable its adopt button and change the button text to "Success", so the user gets some feedback.Any errors are logged to the console.
解説
- デプロイされた
Adoption契約にアクセスしてから、getAdopters()そのインスタンスを呼び出します。- 最初に
adoptionInstanceスマートコントラクトコールの外側で変数を宣言するので、最初に取得した後にインスタンスにアクセスできます。- call()を使用すると、完全なトランザクションを送信しなくてもブロックチェーンからデータを読み取ることができます。つまり、エーテルを費やす必要がなくなります。
- 電話
getAdopters()をした後、私たちはそれらすべてをループし、各ペットに住所が保存されているかどうかを確認します。配列にはアドレス型が含まれているので、Ethereumは16個の空のアドレスで配列を初期化します。これが、nullや他の誤った値ではなく空のアドレス文字列をチェックする理由です。- いったん
petId対応するアドレスを持つが発見され、私たちは、そのボタンを採用し、ボタンのテキストを「成功」に変更無効にするので、ユーザーは、いくつかのフィードバックを取得します。- エラーがあればコンソールに記録されます。
Handling the adopt() Function
(1)handleAdoptの中のコメントを削除し、以下のコードを入力します。
var adoptionInstance;

web3.eth.getAccounts(function(error, accounts) {
  if (error) {
    console.log(error);
  }

  var account = accounts[0];

  App.contracts.Adoption.deployed().then(function(instance) {
    adoptionInstance = instance;

    // Execute adopt as a transaction by sending account
    return adoptionInstance.adopt(petId, {from: account});
  }).then(function(result) {
    return App.markAdopted();
  }).catch(function(err) {
    console.log(err.message);
  });
});
Things to notice:
We use web3 to get the user's accounts. In the callback after an error check, we then select the first account.
From there, we get the deployed contract as we did above and store the instance in
adoptionInstance. This time though, we're going to send a transaction instead of a call. Transactions require a "from" address and have an associated cost. This cost, paid in ether, is called gas. The gas cost is the fee for performing computation and/or storing data in a smart contract. We send the transaction by executing theadopt()function with both the pet's ID and an object containing the account address, which we stored earlier inaccount.The result of sending a transaction is the transaction object. If there are no errors, we proceed to call our
markAdopted()function to sync the UI with our newly stored data.
解説
- ユーザーのアカウントを取得するためにweb3を使用します。エラーチェック後のコールバックで、最初のアカウントを選択します。
- そこから、上で行ったようにデプロイ済みの契約を取得し、インスタンスをに格納しますadoptionInstance。ただし今回は、通話の代わりにトランザクションを送信します。トランザクションには「差出人」アドレスが必要であり、それに関連したコストがかかります。エーテルで支払われるこの費用はガスと呼ばれます。ガス代は、スマートコントラクトに計算を実行したりデータを保存したりするための料金です。adopt()ペットのIDと、先ほど保存したアカウントアドレスを含むオブジェクトの両方を使用して関数を実行してトランザクションを送信しaccountます。
- トランザクションを送信した結果がトランザクションオブジェクトです。エラーがなければmarkAdopted()、UIを新しく保存したデータと同期させるために関数を呼び出します。
これで準備完了。 完成コードは以下の通り(2019/7/9時点) 注:ちょっと自信ないです。ここ違う!ってところあったら教えてください
App = {
  web3Provider: null,
  contracts: {},

  init: async function() {
    // Load pets.
    $.getJSON('../pets.json', function(data) {
      var petsRow = $('#petsRow');
      var petTemplate = $('#petTemplate');

      for (i = 0; i < data.length; i ++) {
        petTemplate.find('.panel-title').text(data[i].name);
        petTemplate.find('img').attr('src', data[i].picture);
        petTemplate.find('.pet-breed').text(data[i].breed);
        petTemplate.find('.pet-age').text(data[i].age);
        petTemplate.find('.pet-location').text(data[i].location);
        petTemplate.find('.btn-adopt').attr('data-id', data[i].id);

        petsRow.append(petTemplate.html());
      }
    });

    return await App.initWeb3();
  },

  initWeb3: async function() {
    if (window.ethereum) {
      App.web3Provider = window.ethereum;
      try {
        await window.ethereum.enable();
      } catch (error) {
        console.error("User denied account access")
      }
    }
    else if (window.web3) {
      App.web3Provider = window.web3.currentProvider;
    }
    else {
      App.web3Provider = new Web3.Providers.HttpProvider('http://localhost:7545');
    }
    web3 = new Web3(App.web3Provider);
    return App.initContract();
  },

  initContract: function() {
    $.getJSON('Adoption.json', function(data) {
      var AdoptionArtifact = data;
      App.contracts.Adoption = TruffleContract(AdoptionArtifact);
      App.contracts.Adoption.setProvider(App.web3Provider);
      return App.markAdopted
    })

    return App.bindEvents();
  },

  bindEvents: function() {
    $(document).on('click', '.btn-adopt', App.handleAdopt);
  },

  markAdopted: function(adopters, account) {
    var adoptionInstance;

    App.contracts.Adoption.deployed().then(function(instance) {
      adoptionInstance = instance;

      return adoptionInstance.getAdopters.call();
    }).then(function(adopters) {
      for (i = 0; i < adopters.length; i++) {
        if (adopters[i] !== '0x0000000000000000000000000000000000000000') {
          $('.panel-pet').eq(i).find('button').text('Success').attr('disabled', true);
        }
      }
    }).catch(function(err) {
      console.log(err.message);
    });
  },

  handleAdopt: function(event) {
    event.preventDefault();

    var petId = parseInt($(event.target).data('id'));

    var adoptionInstance;

    web3.eth.getAccounts(function(error, accounts) {
      if (error) {
        console.log(error);
      }

      var account = accounts[0];

      App.contracts.Adoption.deployed().then(function(instance) {
        adoptionInstance = instance;

        return adoptionInstance.adopt(petId, {feom: account});
      }).then(function(result) {
        return App.markAdopted();
      }).catch(function(err) {
        console.log(err.message);
      });
    });
  }

};

$(function() {
  $(window).load(function() {
    App.init();
  });
});
MetaMaskのインストールと設定
Ethereumのベターなウォレット。Chromeが一番簡単だと思うけど、FireFoxでも出来る見たい。 ちなみに自分はデフォルトをsafariにしているんだけど、しばらくそのことに気づかなくて、動かない!ってなってました。なので同じようにsafariをデフォルトにしている人は気をつけよう。
(1) MetaMaskをインストール(これは適当にググれば出てくる)
(2) インストール後はブラウザーの指示に従って進む
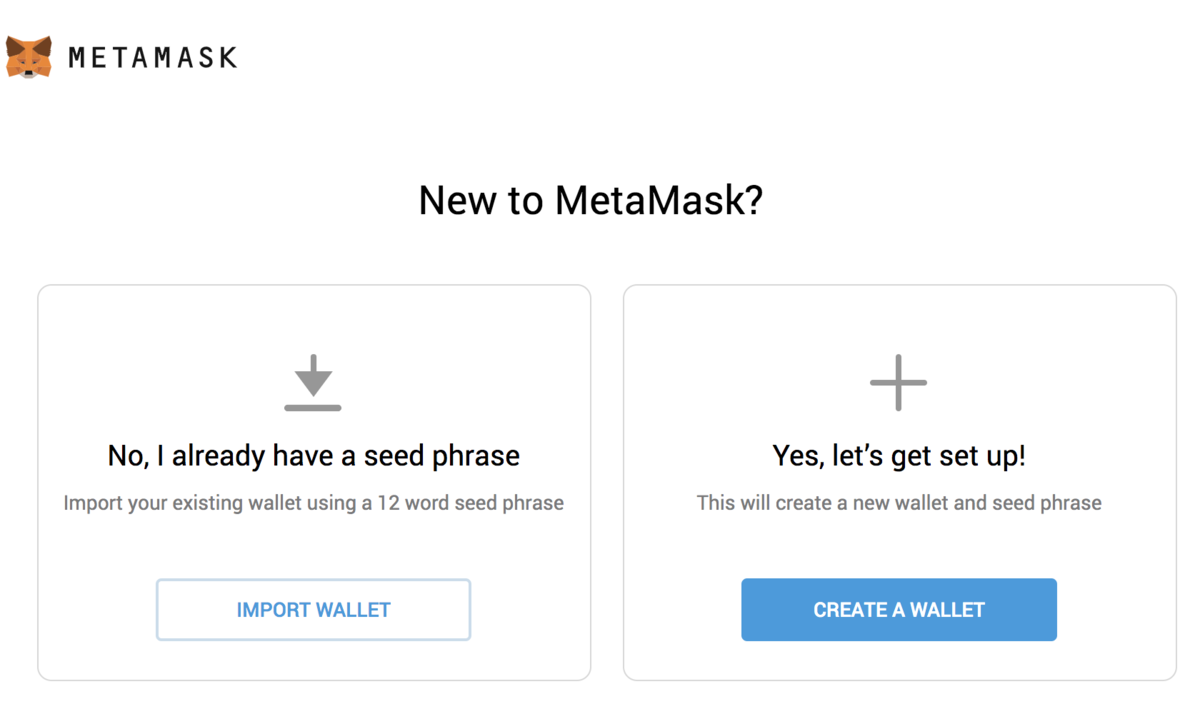
(3)After clicking Getting Started, you should see the initial MetaMask screen. Click Import Wallet.
ここでinportを選ぶことで先ほど作ったGanacheに接続できます。すでにログインした場合は一度ロフアウトすると出来ると思う(多分ログイン状態でも出来るんだろうけど、自分はうまくいかなかった。出来るなら気にしないでください)
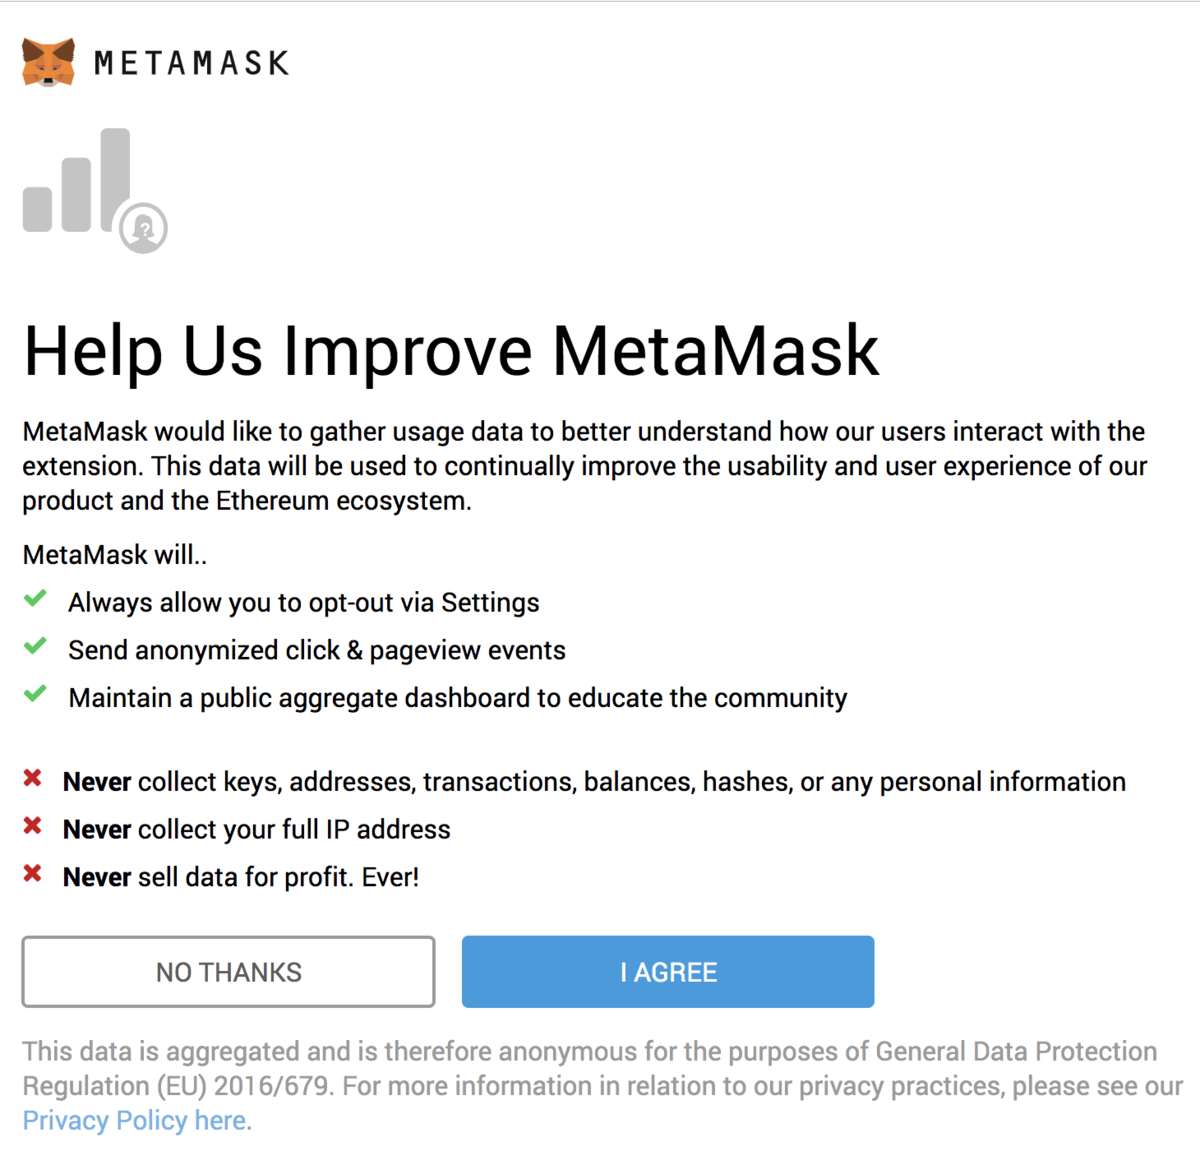
(4)Next, you should see a screen requesting anonymous analytics. Choose to decline or agree.
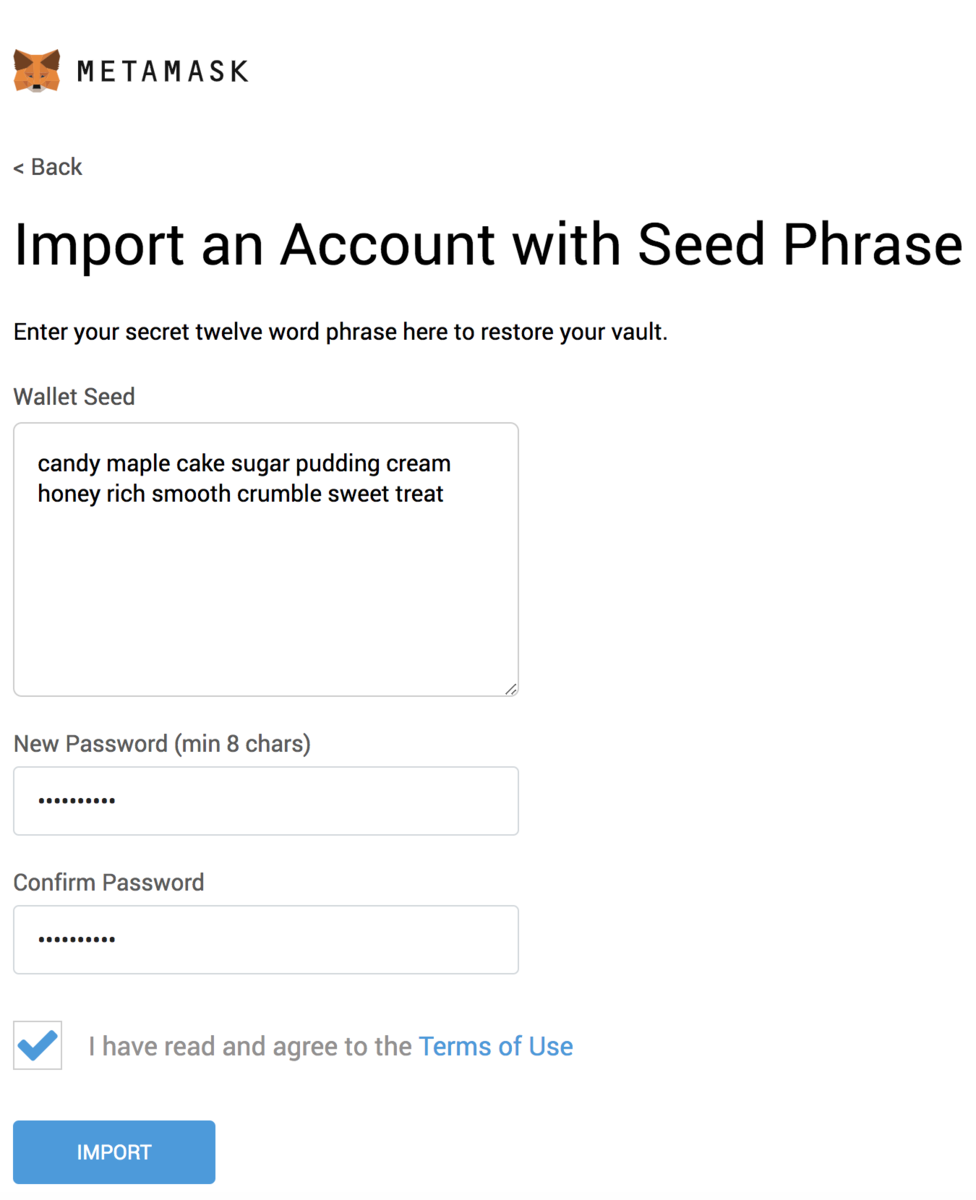
(5) Ganacheのニーモニックを入れましょう。任意のパスワードを入れてimportしたらOK.
Warning: Do not use this mnemonic on the main Ethereum network (mainnet). If you send ETH to any account generated from this mnemonic, you will lose it all!
Enter a password below that and click OK.
(6) ここまで全て順調にいけば以下の画面が出ます。Doneを押して終了

(7)Now we need to connect MetaMask to the blockchain created by Ganache. Click the menu that shows "Main Network" and select Custom RPC.
これで、MetaMaskをGanacheによって作成されたブロックチェーンに接続する必要があります。「メインネットワーク」と表示されているメニューをクリックし、「カスタムRPC」を選択します。

(8) In the box titled "New Network" enter http://127.0.0.1:7545 and click Save.
http://127.0.0.1:7545[ 新しいネットワーク] というタイトルのボックスに「保存」と入力してクリックします。

The network name at the top will switch to say http://127.0.0.1:7545.
(9) 右上のバツボタンを押して戻ります。 Ganacheによって作成された各アカウントには100ETHが与えられます。しかしコントラクト自体が展開されたときとテストが実行されたときに一部のガスが使用されるため、一番上のアカウントのがわずかに少なくなります。なのでその時のガス代によって変動します。
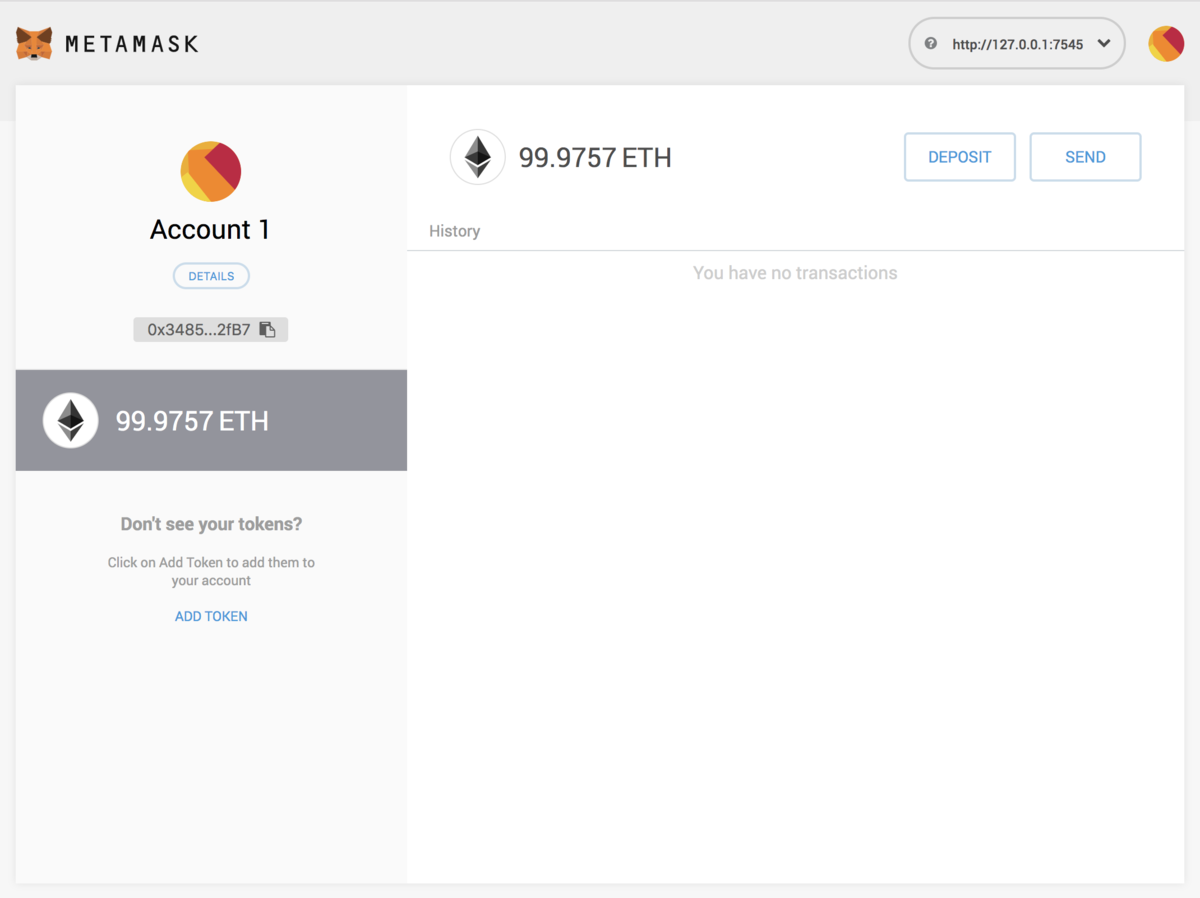
これで設定は終わり! (ウィンドウを狭くすると、Ethの残高部分が振込ボタンと重なる。そういうとこやぞ、MetaMask)
Installing and configuring lite-server
サーバとの関係説明。面倒なので翻訳はなし
We can now start a local web server and use the dapp. We're using the lite-server library to serve our static files. This shipped with the pet-shop Truffle Box, but let's take a look at how it works.
(1) Open bs-config.json in a text editor (in the project's root directory) and examine the contents:
{
  "server": {
    "baseDir": ["./src", "./build/contracts"]
  }
}
This tells lite-server which files to include in our base directory. We add the ./src directory for our website files and ./build/contracts directory for the contract artifacts.
We've also added a dev command to the scripts object in the package.json file in the project's root directory. The scripts object allows us to alias console commands to a single npm command. In this case we're just doing a single command, but it's possible to have more complex configurations. Here's what yours should look like:
"scripts": {
  "dev": "lite-server",
  "test": "echo \"Error: no test specified\" && exit 1"
},
This tells npm to run our local install of lite-server when we execute npm run dev from the console.
Using the dapp
(1) local web serverの立ち上げは以下を入力するだけ。簡単だね
npm run dev
実行すると自動でウィンドウが立ち上がる。
もしsafariで立ち上げてしまったらChromeかFireFoxで表示させよう。

(2) A MetaMask pop-up should appear requesting your approval to allow Pete's Pet Shop to connect to your MetaMask wallet. Without explicit approval, you will be unable to interact with the dapp. Click Connect.
MetaMaskポップアップが表示され、Pete's Pet ShopがあなたのMetaMask財布に接続できるようにするためのあなたの承認を要求するはずです。明示的な承認がないと、dappと対話することはできません。接続をクリックします。 自分はweb画面のadoptをクリックしたら出た。

(3) 適当な犬を選択して押す
(4) トランザクションを承認するかどうかを確認されるので、承認します。

(5) web画面が"Success"となっていたらOK
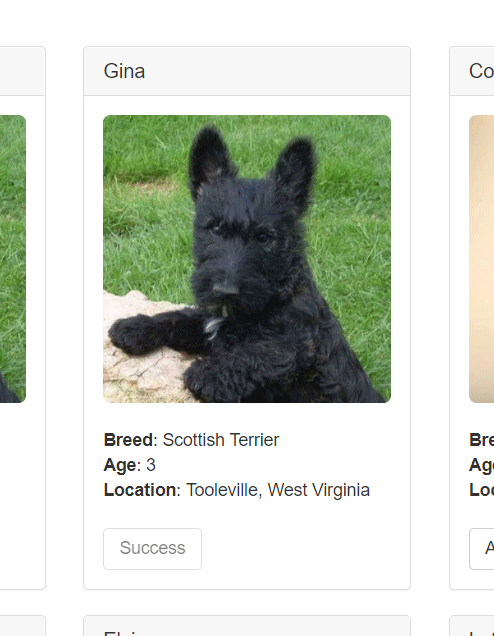
Note: If the button doesn't automatically change to say "Success", refreshing the app in the browser should trigger it.
And in MetaMask, you'll see the transaction listed:
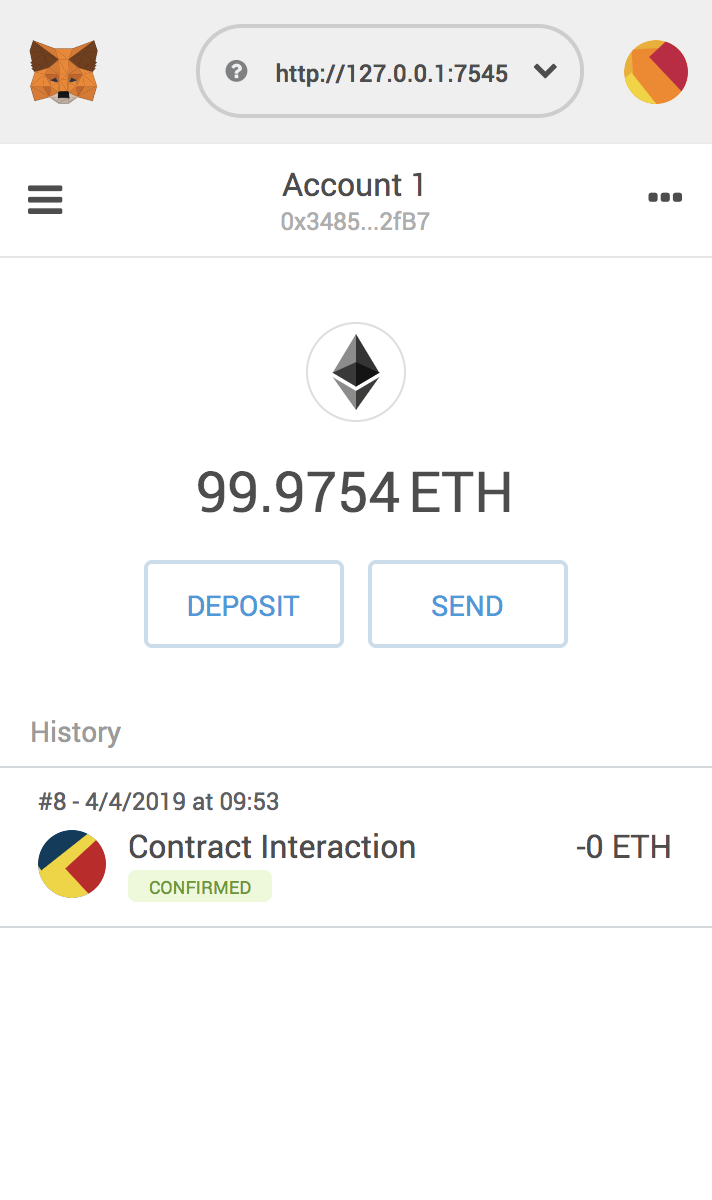
ということで、これにてチュートリアル終わり!
まとめ&所感
テストツールまで入っているのがとてもいい。あと思った以上に簡単だし、わかりやすかった。ただこれだけでは到底自作コントラクトは作れないと思うので、さらなる精進が必要かな。